New from old

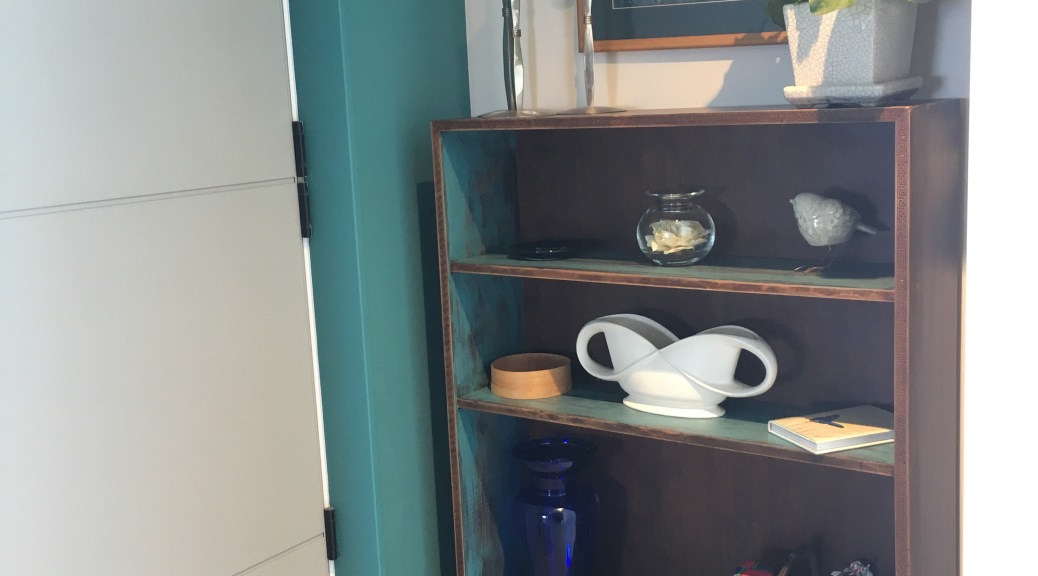
After struggling to find a hall table to fit in a small space by our front door and not being prepared to spend up large for a custom made one I had a brainwave – repurpose a bookshelf I was looking at getting rid of. It was a perfect fit for the space. 

When I was looking at ideas to give the bookcase a new life, I was inspired by a coffee table on etsy 

So used the Christmas/New Year break and Waitangi long weekend to progress my project – although really it only took 4-5 hours to do, the rest was procrastinating and enjoying the summer weather.

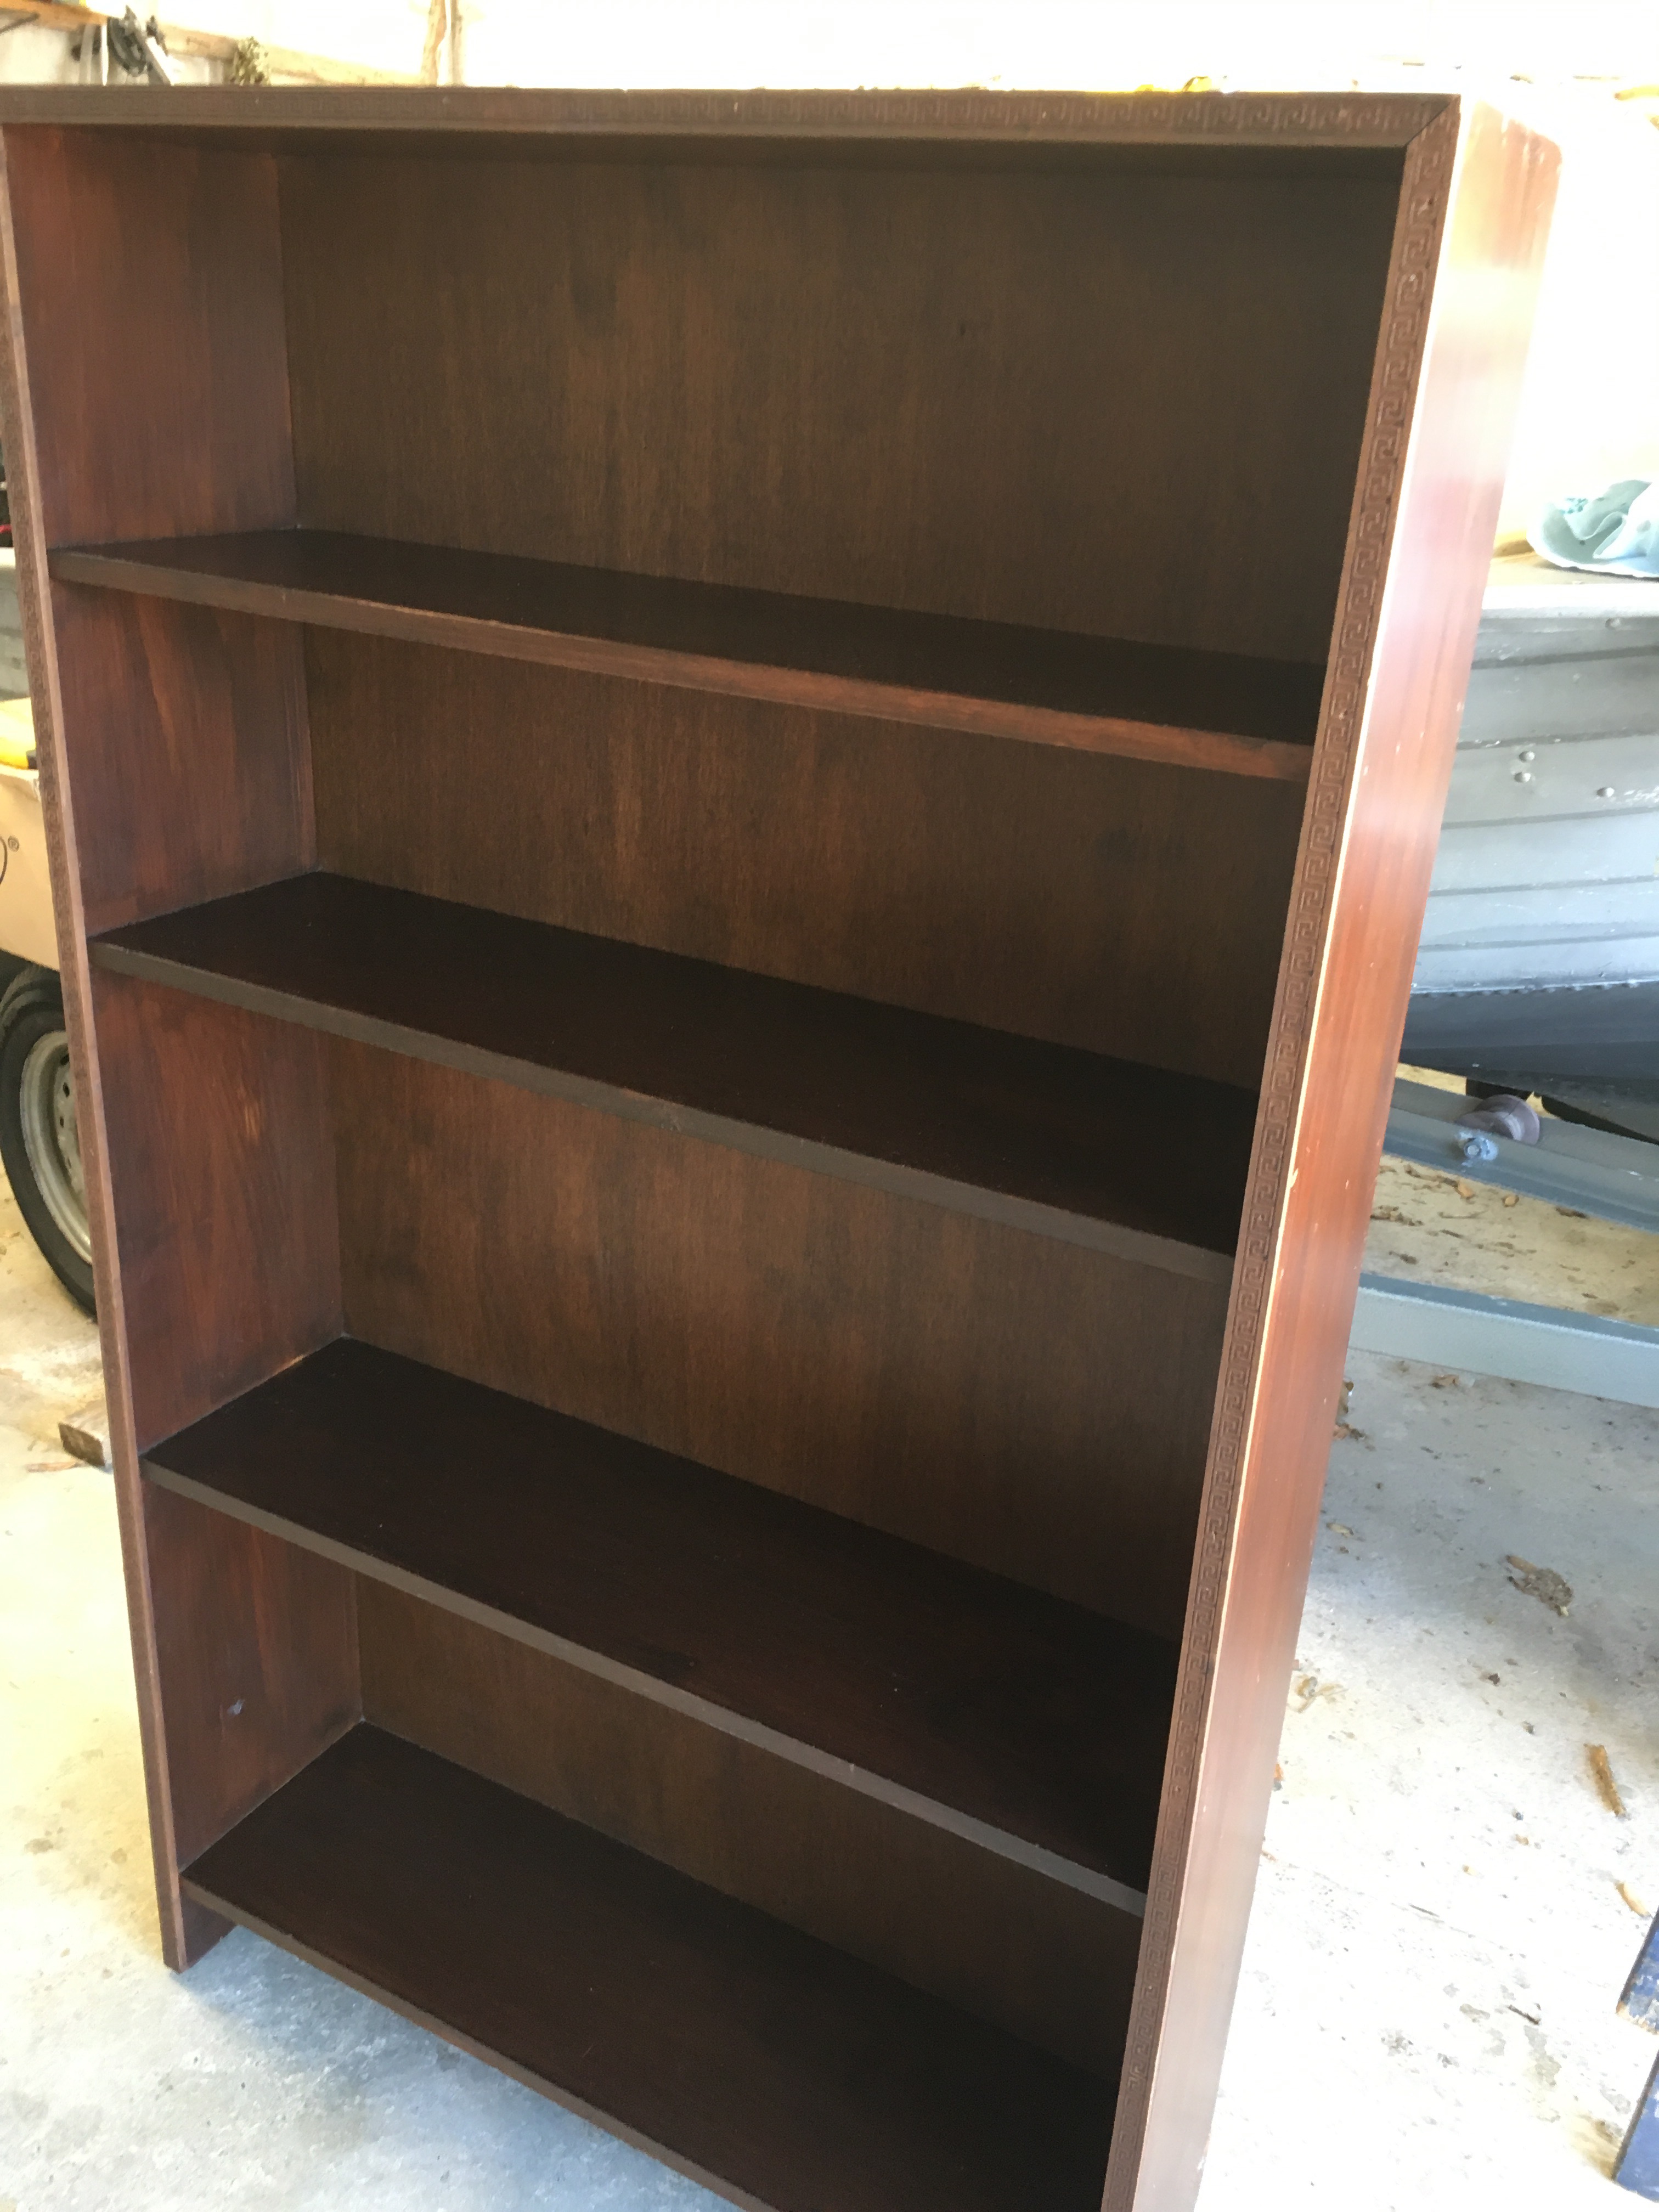
Here’s the bookshelf before I started – it was one my Dad had made for me back in the eighties, so sturdy and in good condition, but with more and more of my books on the kindle, fewer books to put in bookshelves.


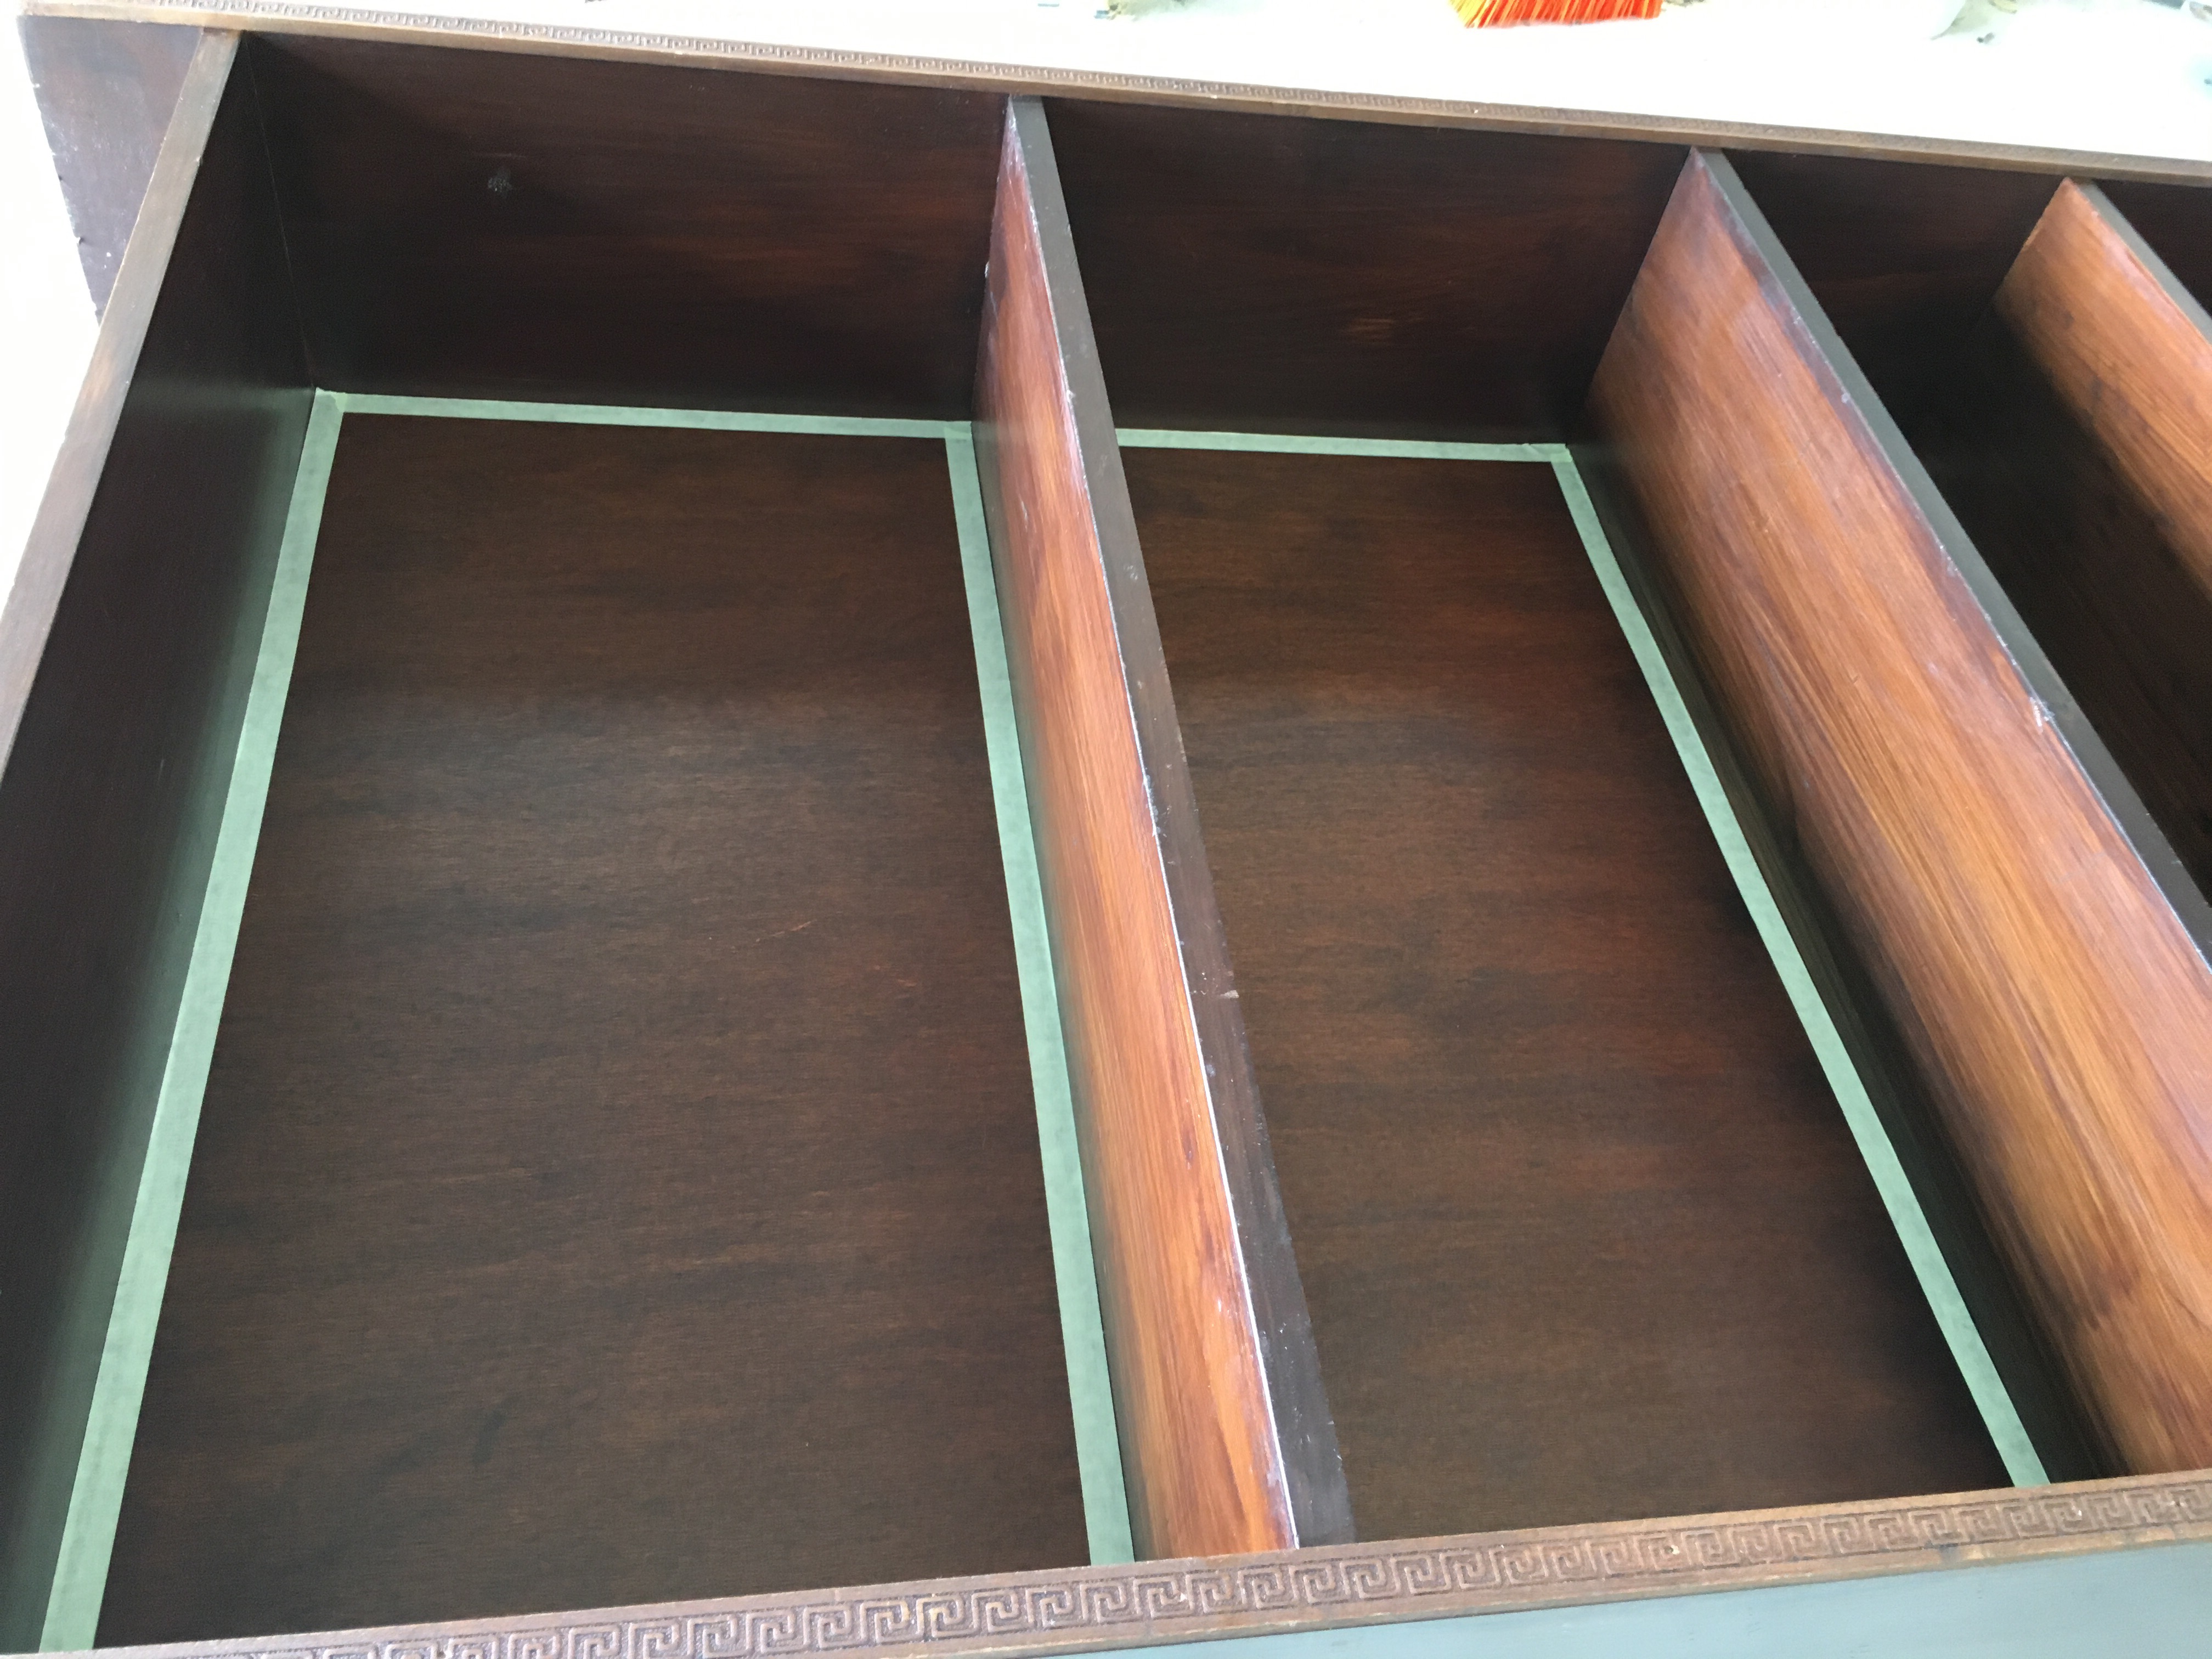
I masked off the back of the bookcase as I wanted to strip the inside of the shelves but not the backing board


After stripping off the old varnish I took off the masking tape and used a sander to give the outside a distressed look and prepare the surface for a new coat of satin varnish.

As I wanted the timber to come through I decided not to put a white coat underneath the green paint, although many blogs recommend it. I had to put more masking tape on to make sure I kept the paint of the bookcase back and front of the shelves. I was lucky to have some paint over from the feature wall in the hallway so used that rather than agonise over choosing the right colour.  I used a coarse brush to apply the paint.


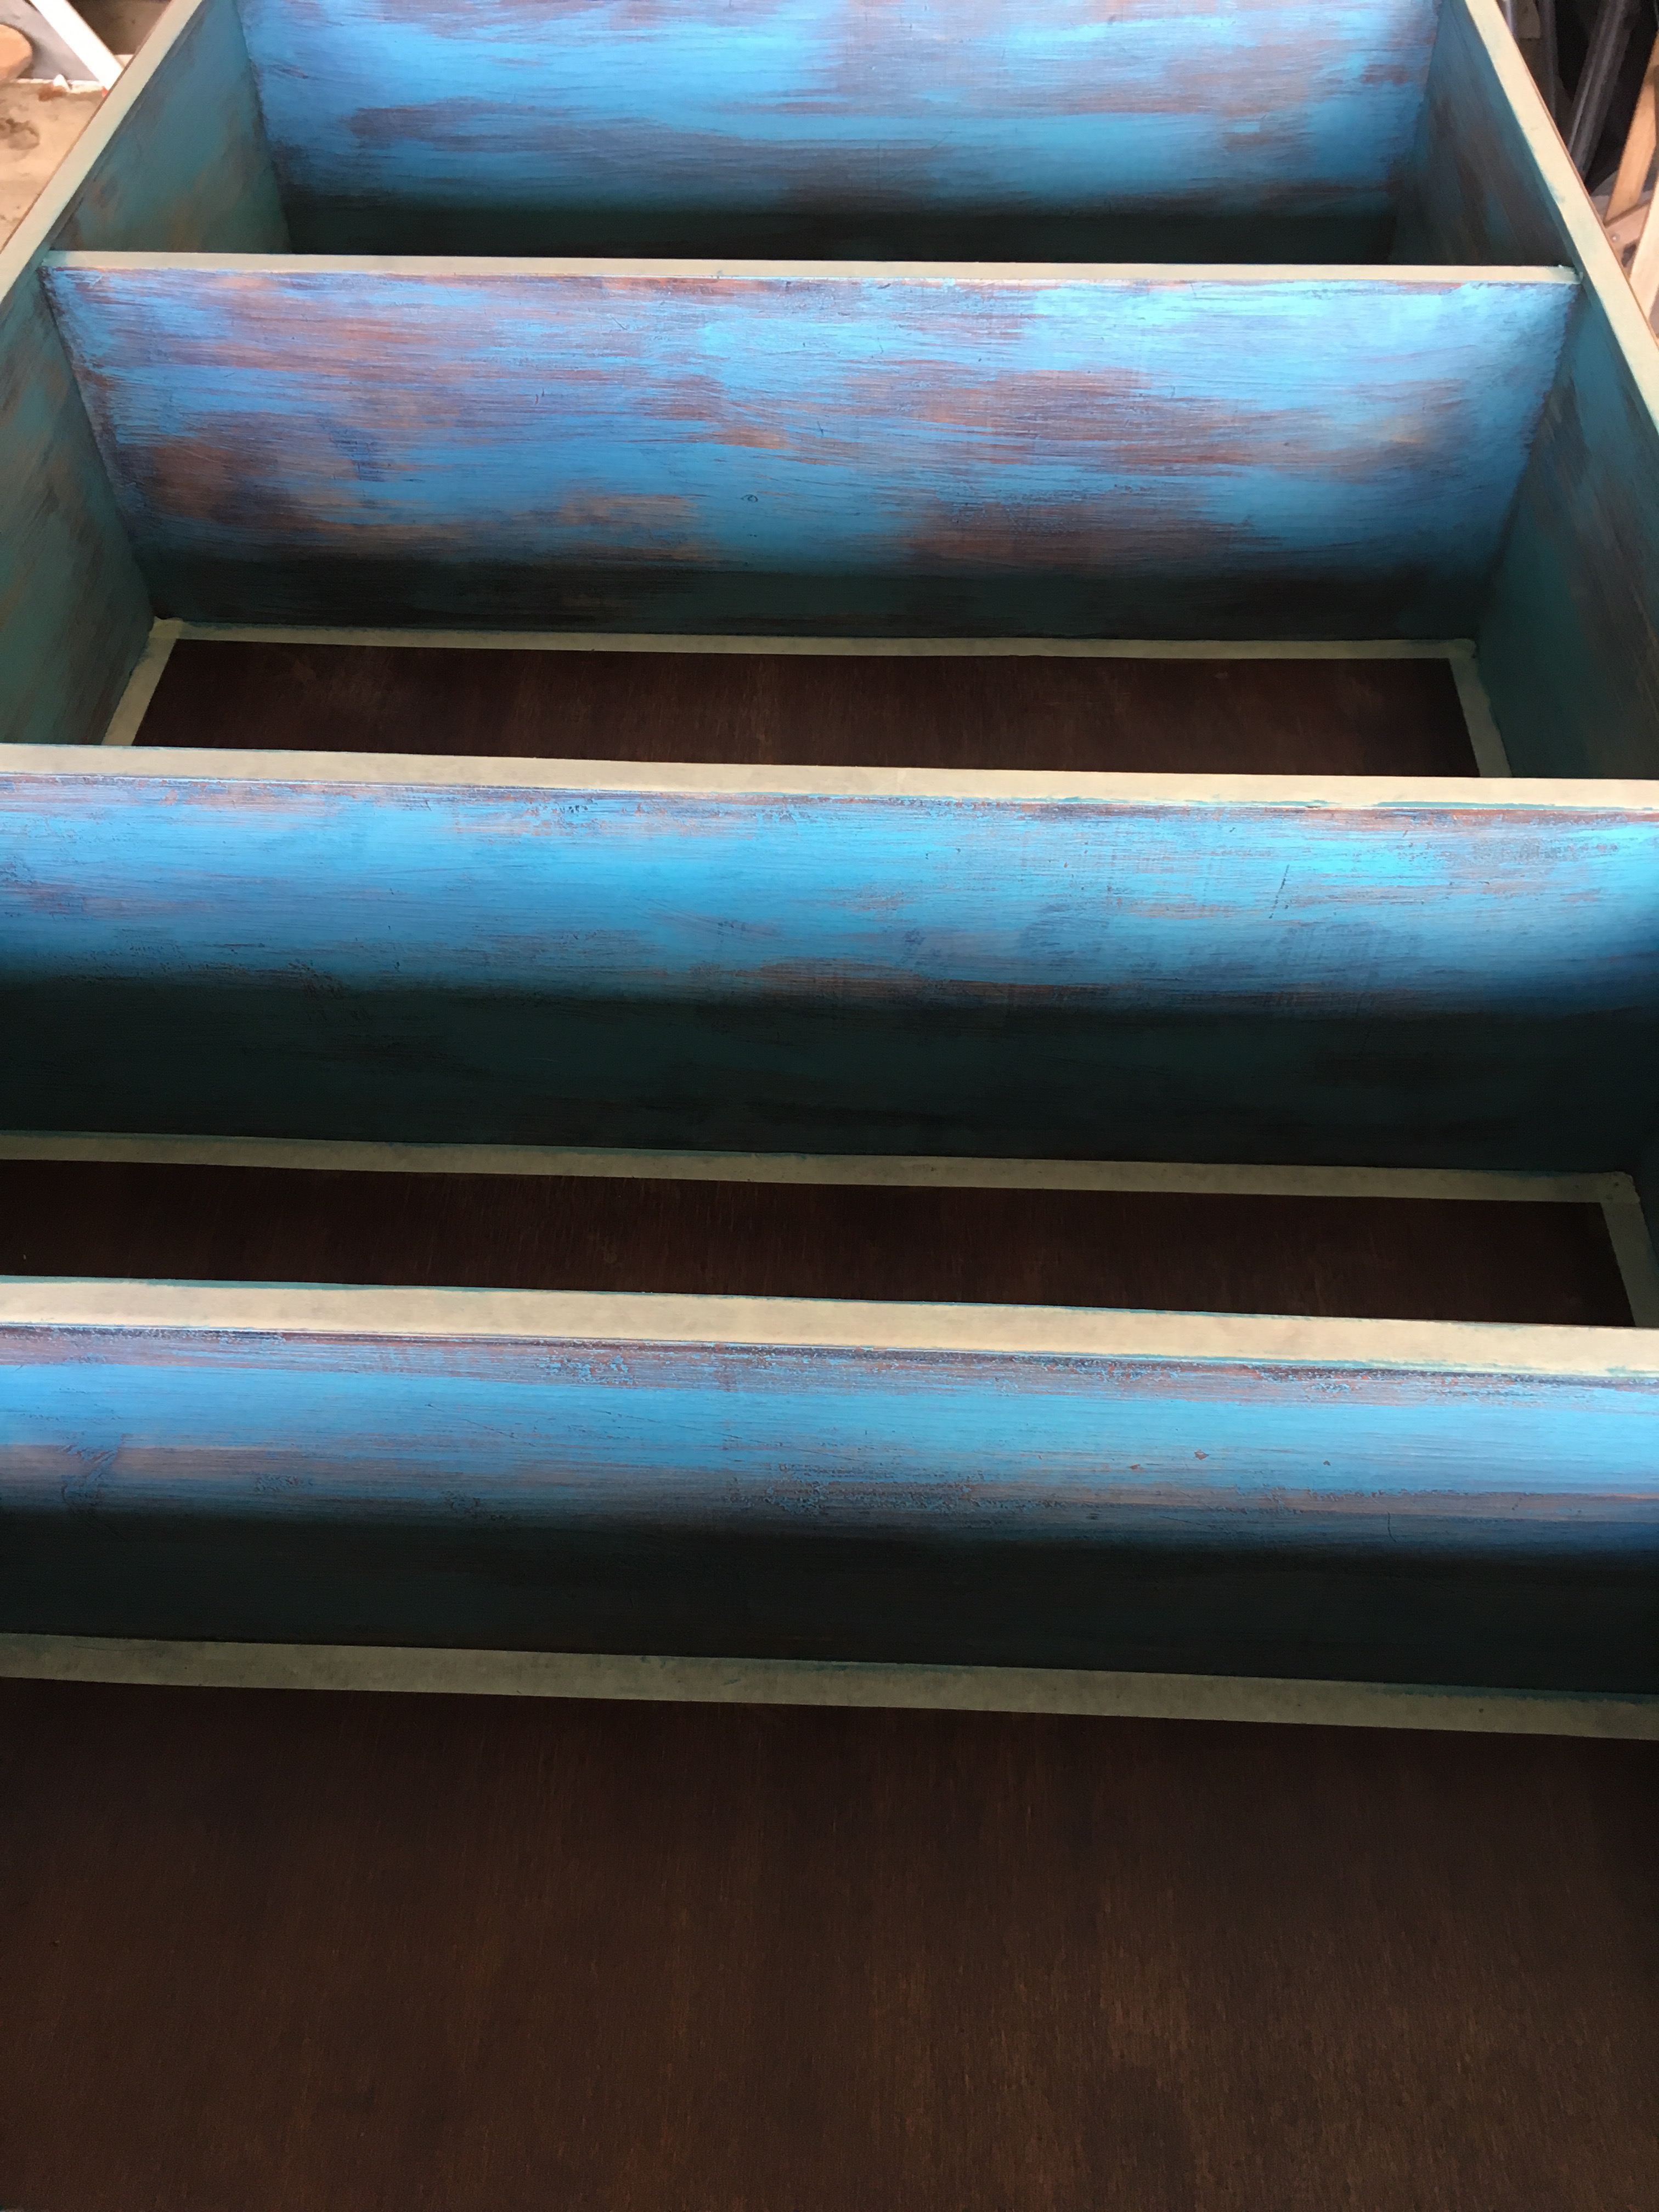
I didn’t get the perfect look for the paint as on the etsy coffee table – once installed in position I was hoping it’d be OK.

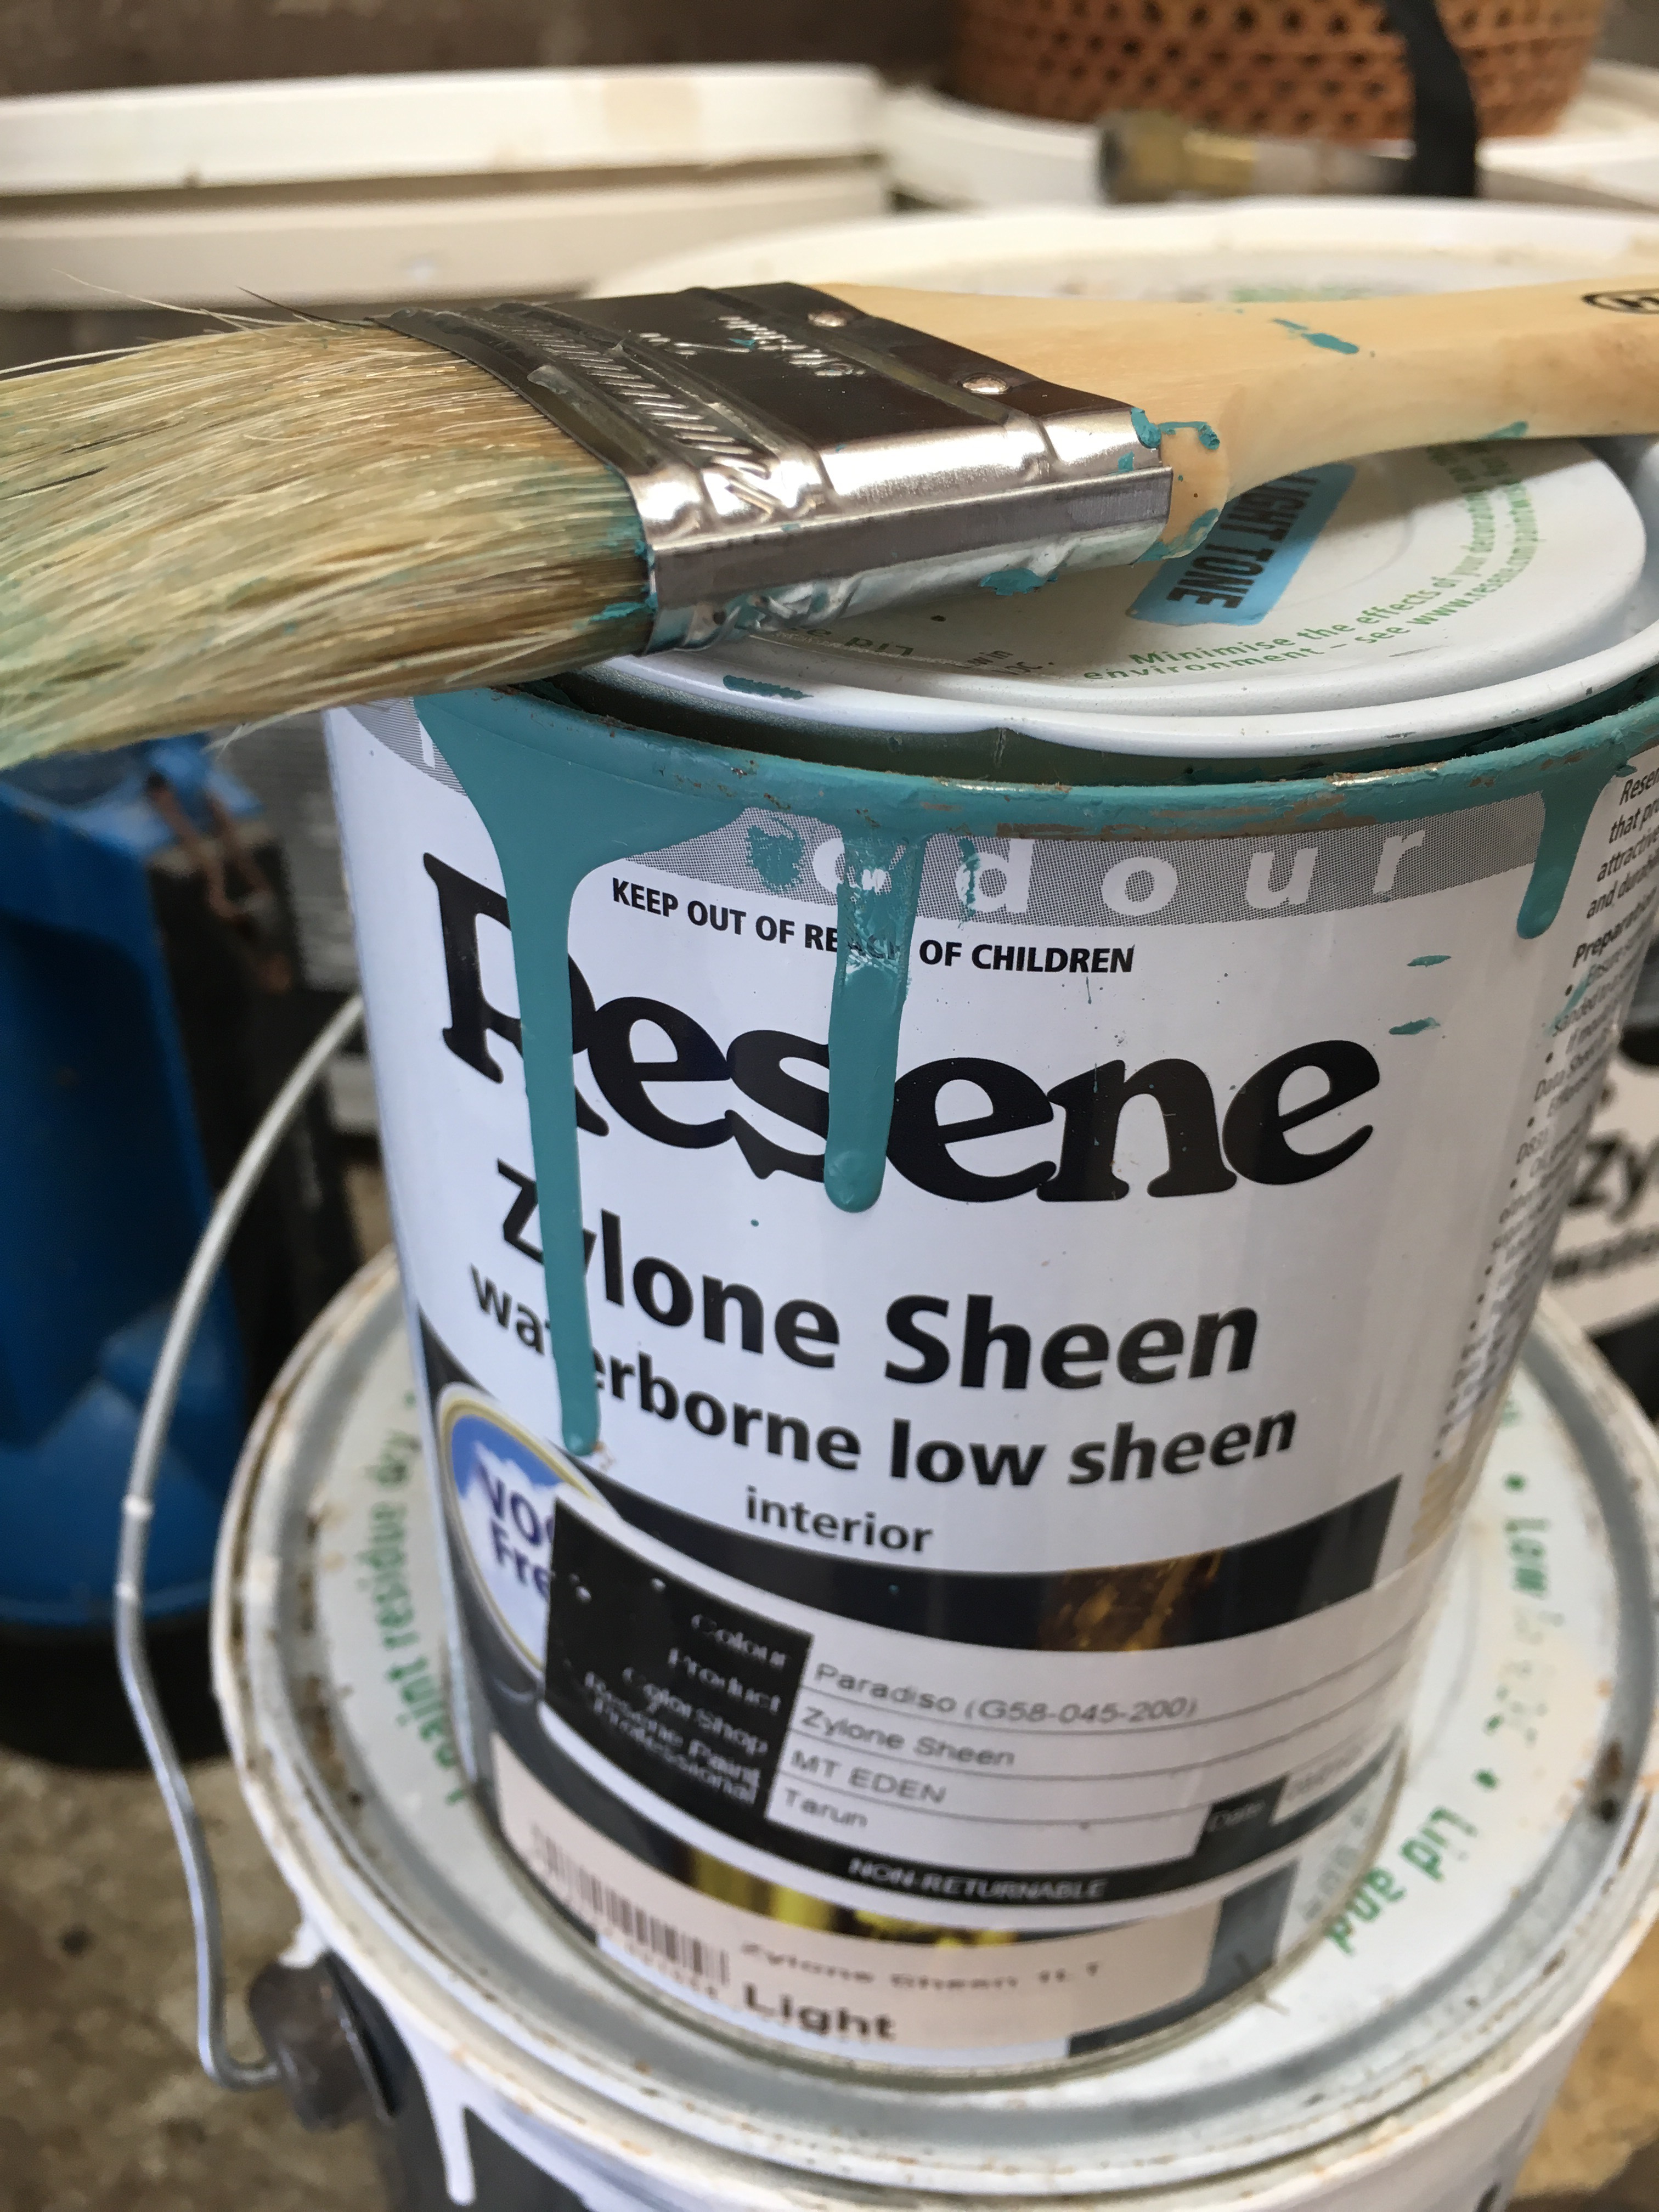
Then came the varnish – I chose a water based satin as the quick drying and clean up in water appealed. Although the fact it was opaque in the tin was offputting, it was easy to apply and see where you’d been and spot drips and runs. Wasn’t sure what size tin to buy and was worried a small can wouldn’t be enough, but the can was seriously much to big for the project – maybe I need to find another project to use some more of it. I used a sponge to apply the varnish – not sure it was better than brush….


Here’s the finished bookshelf in place!


Not sure this would be Dad’s thing but it’s meant that a sentimental piece of furniture has another life.

Sleeping beauty

The finished bedhead

After much procrastination and exploring different options for affixing the panels to the wall , finally the bedhead is up.

I had been inspired by a couple of images on Pinterest:

When we were in Shanghai last year I bought some brocades and then found companion fabrics from a variety of fabric shops here in Auckland.

The process was relatively simple, I just spent a lot of time procrastinating.

  • The builder cut me squares of plywood to 400 X 400mm
  • I stapled on polyester wadding followed by the fabric. If I was doing it again I would consider spending a bit more and buying an electric staple gun, as stapling on wadding and then fabric to the 28 squares gave me a blister and the start of OOS/RSI

    What's underneath
    What’s underneath
  • The upholstering meant that any attempt at direct fixing the panels to the wall wouldn’t work so decided that I would glue a smaller piece of MDF to the back of each square to create a surface to stick to the wall
  • Using traditional fixing like picture hooks or screws would require too much precision and would not make it easy to make minor adjustments, so I investigated industrial Velcro but it was hard to get the pieces of Velcro to “click” together. Finally I went with 3M Command Picture Strips which are a version of Velcro. I overspec-ed them using enough to support around 5 kilos when each panel only weighs around 3 kilos, but important that they stick to the wall, rather than fall on our heads in the middle of the night.
  • I also put one panel up on the wall for a week in a spot where it wouldn’t drop on our heads if the glue failed. Happily I’d passed the test.
  • The command strips took some time to affix, as you had to put them in place, then remove each panel and go through a process of putting 30 seconds of pressure on each of the 168 strips on the wall and the panels to make sure they adhere to the wall in the long term. Not a particularly cheap solution but very flexible with the ability to make minor adjustments without having to reposition the fixings.
  • I had bought several patterns and options for the project, but quickly decided that only a couple of patterns with the plain/textures had more impact. Working out a relatively random pattern also took some time, juggling panels on the floor to make sure I liked the look.

    Refining and simplifying fabric selection then deciding on the pattern
    Refining and simplifying fabric selection then deciding on the pattern

At last I’ve finished, it’s up and looks amazing.

Budding fashionista

Wardrobe panorama
Wardrobe panorama

I would hardly call myself a fashionista, but think our new wardrobe/dressing room would look good on any fashionista’s wish list.

Highly recommend having everything in one place that the extra space allows. Means that getting ready in the morning is a cinch as everything is at your fingertips, no hunting for things in squished spaces anymore. Not sure I got the lions share of the space, but can now easily access all my clothes and shoes in one place where there’s also room to get dressed in.

The insight into prices of a walk-in wardrobe was that they were dependant on using standard units vs customised. It was nearly half the price to use standard units with limited changes in what we had originally looked at getting.

The finish also had a significant impact on price too. We decided to use Wardrobes Direct in Silverdale who had a range of standard melamine colours/patterns. If you wanted another colour/pattern option, it was a minimum of 10% extra. The standard selection was fine unless you were trying to match another melamine, as their standard colours aren’t in other ranges more readily available in New Zealand.

We’re nearly finished, with only a few last bits to be finished, but still a few more tales to tell and a celebration to be had.

Trixie the bathing beauty

The plumber has been working in the bathroom this week so things have been moving again, albeit slowly.

We came home on Wednesday to find most of the bathroom plumbing fittings installed. As we looked at the progress Trixie, our cheeky spoilt Burmese cat had to inspect with us.

Next decision is when to move back up to the bedroom, as there’s still some finishing paint touches to go and some electrical to be installed. This weekend is looking good…

Imagining the view when we finally can have a bath
Maybe I'll re-learn how to use the toilet
Maybe I’ll re-learn how to use the toilet
The plug is interesting
Think his and hers
Think his and hers
Maybe this is more my size....
Maybe this is more my size….
Shower glass finally in


Bathing beauty II

Glass wall installed

Looking back to bath and our view


After a couple of weeks where progress has been slow, things are moving again. It was great to finally see how the major design element in the bathroom looked, have been trying to imagine it for weeks. It has lived up to expectation which is a relief.

The glass splash back wall in the bathroom is looking good, but there were some learnings on the journey from templating to install:

  • Templating takes time as every thing that is being attached to the wall needs to be allowed for in the template
  • Even though toughened glass was used, sheets of glass wouldn’t be strong enough if they had several cut outs, eg around the vanity, so smaller panels were used in some places, but think it has worked and doesn’t look too bitsy
  • we never picked up on the plans that the window above the bath didn’t extend the full length of the bath surround, so we had to look at how we managed the transition from bath and tiles to glass, maybe not as elegant as we would’ve liked, but pretty good given the restrictions on what could be done with the glass
  • the perils of glass company mergers that impacted on the project, a piece of the glass was “lost” and delayed the install and then had a domino effect on other trades lined up to follow with their piece, so we have had to wait for another slot in their diaries
  • install takes several days with fixing glass to the wall being first. Channels to fit the shower glass walls laid day 2. Next siliconing before shower glass walls go in.

Plumbing and final electrical over the next week, so really looking forward to moving back into the new space, timeframe is now in days not weeks or months.

Ring ring

Front entrance progress

Over the last couple of weeks we have moved from entering the house via the laundry door to using our new front door.

At last we can use the front entrance without having to clamber up to the door and worry about the safety of friends when they visit. Now we just need the light fittings installed.

I’m in love with the amazing front door our new keyless entry and doorbell from OZ

The keyless entry is easy to use with either a PIN or a proximity card. It’s very clear when it’s locked or not with different sounds telling you the door is shut and locked or failed to lock. Plus it locks automatically, so no worrying about whether Stewart has remembered to lock the door after himself!

We found that the doorbell was essential with the plasma door as knocking on the outside was virtually soundless.

The end is now in sight with glass for the bathroom due in the next week, carpet laying planned and installation of wardrobe scheduled for 17 February.

Bathing beauty

Bath and vanity nearly installed
Waiting on the green wall and shower glass


Thinking about diving in


Glass mosaic tiles in the shower

The weather is hotting up and so is progress in the bathroom.

All of a sudden, once the tiling was finished, the bathroom started to take shape. The bath frame is in, vanity and mirror cabinets are in, bath and other shower fittings waiting to go in.

At the moment it’s feeling a bit brown as we don’t have the fab green glass wall behind the shower is still to go in. It was templated this week so likely to arrive first week in February. So still a few weeks to go, but the end is in sight. Very exciting!

Ringing the bells in OZ

New doorbell
New doorbell

Who would’ve thought that I’d have to buy our new door bell in Australia?

Our old door bell was looking very old and tatty and not in keeping with our fabulous new front door.

We had a door bell push with two chimes that we bought nearly 10 years ago, one upstairs and one in Mum’s flat. Hardware stores don’t supply the same format any more. I looked on the websites of the brands available in NZ and this product was available in Bunnings Australia. I asked Bunnings Silverdale if they were able to supply it here but was told no. Obviously there’s not enough people who want to buy this type of doorbell to make it worth their while stocking it. Also interesting that Bunnings won’t bring in products on demand from their Australian branches, even if the put on a premium or handling charge which I would’ve happily paid.

So our holiday in Melbourne over the break was a good excuse to go shopping. We went to Bunnings Glenferrie, and we’re amazed at how super helpful and friendly staff were. Found the door bell/chimes I wanted in less than two minutes of arriving in the store. Admittedly we stayed a bit longer in store shopping….

Now waiting for the door handle and lock to be installed so we can start using our smart new door bell.

New Year, new door opens…

Front door
Front door
Stairs
Stairs

Yeah, work has started again with builders and tilers back on site after the holiday break.

The new front door was put in on Monday and all my decisions on the materials and colours look great. So feeling very pleased. The stairs to the front door have also gone in.

Tiler has been on site, but nothing installed yet, can’t wait to see the tiles down. A little worried that he has the entrance and bathroom floor tiles mixed up but have left a written note which Stewart has talked to the tiler about and emailed the builder. So hope that what goes where is clarified and we don’t arrive ho e to find them switched…

All dressed up….

Progress continued over the Xmas New Year break with painters and plasterers completing their jobs. Amazing how different rooms look when they’re painted.

It was a relief to reclaim the bedrooms and bathroom on the main floor which had windows pulled out and refitted as part of the recladding last weekend. But before we could reclaim them, we (me) needed to clear away all the plaster and paint dust. Besides looking great painted, amazing how much else shows up when the rooms are empty.

Realised that I should have pushed to have the plastic sticky floor covering put over the carpet in the hall. It was put in the entranceway, but the hall got more and more plaster walked in, even though I was vacuuming each day after the tradies left. When I pulled up the plastic from the entrance there was an obvious line between where it had been protected and where it hadn’t been. It was great that Jane has a carpet cleaning machine and offered to come around and clean the carpet ahead of moving in. I’m lucky to have such a great friend!

Once again my purchase of “moving sliders” we’re worth their weight in gold. A great find in Bunnings which allow one person to move most furniture on their own. I was able to move dressers, beds, tv and other heavy stuff on my own. One side is for moving items on carpet, the other on polished floors.

Magic sliders
Magic sliders

Unfortunately the tiler didn’t come over the break as originally planned, so no progress happened there.